Troubleshooting

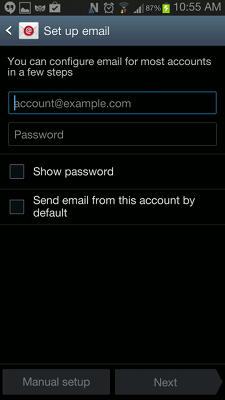
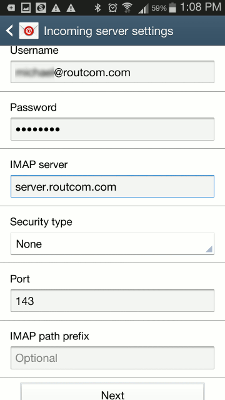
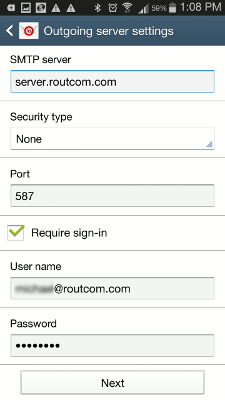
A basic understanding of how the system works will help you to re-establish your Internet connection 90% of the time. There are two main parts of the system; the radio transceiver (radio) and the router. The radio is on the outside of the house, but it is powered from a unit (POE) on the inside of the house. The power runs from the POE to the radio, through a computer cable. 
The POE connects to the Internet/WAN/Modem port on the router, with a computer cable. The router establishes the connection to the Internet through the Routcom network. Two things are required to connect your computer to the Internet. Firstly, a connection must exist between your computer and the router (wired or wireless). Secondly, the router must have a connection to the the Routcom Network. When we install your system, your router is configured with connection information. If your router gets, reset these settings will be lost and your router will not connect to our network.

StepS

  1. Try testing your Internet connection with a different computer. It is always better to test the connection with a computer that is connected via a cable to the router. If the second computer connects, the problem is likely with the first computer. Try restarting this computer. If this doesn’t work or you don’t have a second computer then go to Step 2. 
  2. Unplug the power to your router for five seconds then plug it back in. Wait 1 minute and then try to connect. (Note: the router can be unplugged from power by removing the small round black cable from the back of the router. Do not remove the computer cables from the router.(computer cables, or more properly cat5 cables, look like the phone cables with a clear plastic end, only slightly larger.
    Try to reconnect. 
    If you still can’t connect continue to Step 3.
     
  3. Unplug the power cable to the POE (power over ethernet) device and plug back in after 5 seconds. The power cable is generally black and does not look like a computer cable. The POE is much smaller than the router and is connected to the Internet/WAN/Modem port of the router with a computer cable. Don’t unplug the computer cables froms the POE, however if you do unplug them, make sure they go back into the port they came out of. Wait 10 seconds and then repeat Step 1.

IMAP Email

IMAP allows simultaneous access to your Email across all of your devices. It will update any changes made to any device that has been set up to use IMAP. For instance, if you read an Email on your phone, it will be marked as read on your desktop. IMAP will also propagate deletions, moves, and copies. Think of it as all of your devices using the same Email location instead of downloading to each separate device.

ANDROID IMAP Email Setup

Android is the operating system for many phones and devices on the market. Below is a set of instructions to get your device working with Routcom Email using IMAP.

Step 1

Open the apps tray.
*May look different depending on your version of Android your
device has, but all Androids have an apps tray.

Step 2

Select “Settings”

Step 3

Scroll down to “Accounts” 
Select “Add Account”

Step 4

Select “Email”

Step 5

Enter your Routcom Email account and password.
Select whether you wish to send email from this account by default.
Select “Manual Setup” on the bottom left of the screen.

Step 6

Select “IMAP Account”

Step 7

Change “Username” to your Routcom email address 
Change “IMAP server” to routcom.com 
Select “Next”

Step 8

Change SMTP server to routcom.com
Set the Port to 587
Select “Next”

Step 9

Select these options as you see fit. 
Select “Next”

Step 10

You may name this account if you have similar accounts.
You may also change your name as it appears on outgoing messages.
Select “Done”

Step 11

Press your Android’s “Home” button to get back to your main screen.
Select “Apps” again to open your apps tray.
Select the “Email” app

Step 12

Your email is now set up on your Android for IMAP. 
If you have more than one email address associated with the Email app,
tap “Inbox” at the top of the screen and select your Routcom address.

IPHONE IMAP Email Setup

Below is a set of instructions to get your iOS7 iPhone working with Routcom Email using IMAP.
These instructions may also be used with previous versions of iPhone, iPod and iPad, but the images and steps may appear slightly different.

Step 1

Open Settings 

Step 2

Scroll down to “Mail, Contacts, and Calendars” and select it.

Step 3

Scroll down to “Accounts” 
Select “Add Account”

Step 4

Select “Other”

Step 5

Select “Add Mail Account”

Step 6

Enter your Name. 
Enter your Routcom Email address and password.
Select “Next” on the top right of the screen.

Step 7

IMAP should be the default option. 
Change “Incoming mail server to routcom.com
Change “User name” to your Routcom Email address. 
Scroll down and change “Outgoing mail server hostname” to routcom.com
Change “User name” to your Routcom Email address. 
Enter your Routcom password 
Press “Next”

Step 8

If a popup appears indicating “Cannot verify server identity” press “Continue”
Press “Save”

Step 9

Select the “Routcom” mail account

Step 10

Scroll down and select “Advanced”

Step 11

Select “Drafts Mailbox”

Step 12

Under “On the server” select “Drafts” 
Go back to “Advanced” using the top left arrow and repeat for “Sent” and “Deleted” so your iPhone will sync all of these folders with the Routcom server.
Press the “Home” button on the iPhone.

Step 13

Open your “Mail” app

Step 14

Your Routcom Email account is now set up for your device.
If you have more than one Email account on your phone, Select the left arrow at the top left of the screen and select your Routcom mailbox to view your Routcom Email.

Close Menu